Tutorial 4 with custom model, lighting not right
5 posters
 Tutorial 4 with custom model, lighting not right
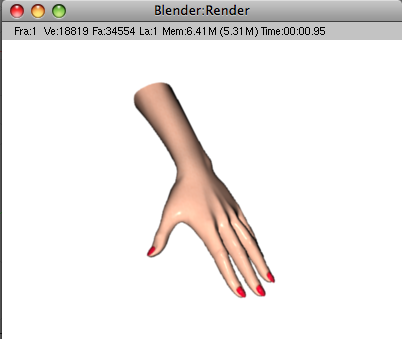
Here is how my model looks in blender:

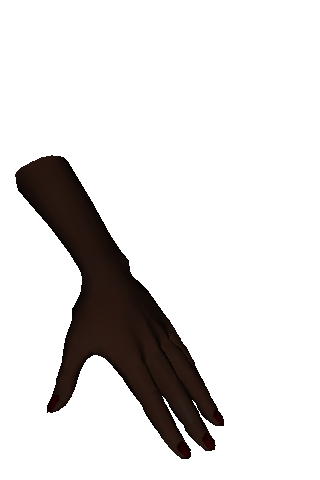
Here is how it looks on the iphone:

And on the iphone with vertex color "baked in":

I've searched the forum and have done the following:
* Selected all objects (model, camera, light) by clicking ctl-A before running export script
* Recalculated the normals of the object (edit mode / ctl-n)
* Adjust the objects center (mesh window press Center New)
* Export the normals (push N button before running export script)
I also played with the lighting intensity and position, but it didn't make any difference .. and when rendering in blender the lighting looks fine.
The .blend model is here

Here is how it looks on the iphone:

And on the iphone with vertex color "baked in":

I've searched the forum and have done the following:
* Selected all objects (model, camera, light) by clicking ctl-A before running export script
* Recalculated the normals of the object (edit mode / ctl-n)
* Adjust the objects center (mesh window press Center New)
* Export the normals (push N button before running export script)
I also played with the lighting intensity and position, but it didn't make any difference .. and when rendering in blender the lighting looks fine.
The .blend model is here
branchcut- Posts : 6
Join date : 2009-08-10
 Re: Tutorial 4 with custom model, lighting not right
Oops, the original model I posted didn't have any textures. Here is the model with textures but without following changes done yet:
* Recalculated the normals of the object (edit mode / ctl-n)
* Adjust the objects center (mesh window press Center New)
* Recalculated the normals of the object (edit mode / ctl-n)
* Adjust the objects center (mesh window press Center New)
branchcut- Posts : 6
Join date : 2009-08-10
 Re: Tutorial 4 with custom model, lighting not right
Well I made a little progress. I noticed that the model had two textures, a color texture and a specular texture. (I'm not the one who created the model, which is why I left out this detail)
Just experimenting, I removed the specular texture, and it looks better in terms of being well-lit:

but a lot of the 3D effect has been lost. (compare it to the image in original post on this thread)
Is it possible to add multiple textures to a model? I went through the tutorials, and I think I remember that there was a limitation on this.
PS: Forgot to mention I'm a 3D/sio2 newbie ..
Just experimenting, I removed the specular texture, and it looks better in terms of being well-lit:

but a lot of the 3D effect has been lost. (compare it to the image in original post on this thread)
Is it possible to add multiple textures to a model? I went through the tutorials, and I think I remember that there was a limitation on this.
PS: Forgot to mention I'm a 3D/sio2 newbie ..
branchcut- Posts : 6
Join date : 2009-08-10
 Re: Tutorial 4 with custom model, lighting not right
but a lot of the 3D effect has been lost. (compare it to the image in original post on this thread)
>> Welcome to the world of realtime graphics Your job is to make it look just as good as rendering but running at 30+ fps
Is it possible to add multiple textures to a model? I went through the tutorials, and I think I remember that there was a limitation on this.
>> 2
>> Welcome to the world of realtime graphics
Is it possible to add multiple textures to a model? I went through the tutorials, and I think I remember that there was a limitation on this.
>> 2
 Re: Tutorial 4 with custom model, lighting not right
OK so max 2 textures per model? Can they be "composed"? Eg, one on top of the other so they combine in a layering fashion? Hope that makes some sense.
Thanks for the welcome message
Thanks for the welcome message
branchcut- Posts : 6
Join date : 2009-08-10
 Re: Tutorial 4 with custom model, lighting not right
OK so max 2 textures per model?
>> No per material
Can they be "composed"? Eg, one on top of the other so they combine in a layering fashion? Hope that makes some sense.
>> Check the video tutorial03 for more info.
>> No per material
Can they be "composed"? Eg, one on top of the other so they combine in a layering fashion? Hope that makes some sense.
>> Check the video tutorial03 for more info.
 Re: Tutorial 4 with custom model, lighting not right
So just a follow up in case it helps any other newbies ..
I think I know what the root cause of the original dark hand was -- sio2 was taking the specular map and applying it as a normal texture. Once I removed the specular map, it looked just like the shadeless mode in blender.
The reason it looks like the shadeless mode in blender (Material buttons / Materials / Push Shadeless), and not the shaded mode .. is because:
and the fix is to use one or more of the following techniques:
* DOT3 (video tut)
* projected shadow
* planar shadow
* projected geometry using alpha test.
If anyone can explain these techniques more, or point to which video tutorials contain examples .. would be appreciated
I think I know what the root cause of the original dark hand was -- sio2 was taking the specular map and applying it as a normal texture. Once I removed the specular map, it looked just like the shadeless mode in blender.
The reason it looks like the shadeless mode in blender (Material buttons / Materials / Push Shadeless), and not the shaded mode .. is because:
Blender shadows won't work in SIO2... It's totally different for rendering and in the viewport is driven by GLSL. (ref)
and the fix is to use one or more of the following techniques:
* DOT3 (video tut)
* projected shadow
* planar shadow
* projected geometry using alpha test.
If anyone can explain these techniques more, or point to which video tutorials contain examples .. would be appreciated

branchcut- Posts : 6
Join date : 2009-08-10
 Re: Tutorial 4 with custom model, lighting not right
Tutorial04 explains how to add planar shadows and tutorial11 about shadow maps.
Francescu- Posts : 136
Join date : 2009-03-18
 Re: Tutorial 4 with custom model, lighting not right
Hi Branchcut,
I'm new in SIO2 (This is my first post), but I'm not new in Blender.
For the texture looking, what I would do is to Bake the Texture as UV for
your model in Blender, using Ambient Occlusion, to see if you can sort of fake some subtle dirt shadows etc.
And for the light reflections, I know that in Blender you can also Bake the Normal Maps, as Blender uses GLSL as well. But I don't know yet how to use it in SIO2.
Cheers
palagroup- Posts : 1
Join date : 2009-08-13
 Re: Tutorial 4 with custom model, lighting not right
Thank you! I will try it and post the result if there is an improvement.
branchcut- Posts : 6
Join date : 2009-08-10
 Re: Tutorial 4 with custom model, lighting not right
Hi, I too am struggling with how best to use my tangent space normals in SIO2; the method in tutorial03 works fine for shadow maps on static objects but to make a game character shine, I'm looking to add more realism with SIO2 animation. The DOT3 lighting example looks good, but I'm not sure what the performance will be with animation.
Anyone have any recommendations for using normals? Just bake a texture, or is there a better way?
--yarri
EDIT: Sorry, just realized that you've already covered this in the following thread... I'll do some experiments on 1.4:
https://sio2interactive.forumotion.net/sio2-engine-f3/dot3-normal-bump-mapping-per-pixel-lighting-t544.htm?highlight=dot3
yarri- Posts : 81
Join date : 2009-04-10
 Similar topics
» Tutorial#2 - Custom model doesn't respond to touch input
» Problem in tutorial 02 using my own model
» Custom resources
» Help With Custom Function in sio2_physic.cc
» model disappears when doing sio2ObjectSoftCopy
» Problem in tutorial 02 using my own model
» Custom resources
» Help With Custom Function in sio2_physic.cc
» model disappears when doing sio2ObjectSoftCopy
Permissions in this forum:
You cannot reply to topics in this forum